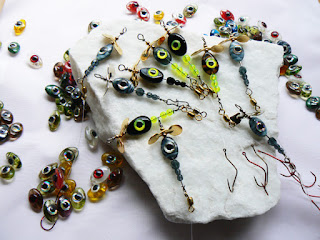
Fish Creek Spinner Zonker Spinnerbaits Fish Creek Spinners Armadillo Trout Spinners 1/8oz Propellor spinners Fish Creek Spinners large fishing spinners Fish Creek Spinners Metal Armadillos

Sunday, September 1, 2013

Fish Bone Combs

I know a woman, she'll make a freight train moan.

I know a woman, she'll make a freight train moan.

She combs her hair, with Catfish bones.

Ray Wylie Hubbard - Weevils.

Whew, it's been awhile since the last blog post. This season I took a break from pushing wholesale spinners and let the online business have it's course.

After seeing Ray Wylie Hubbard on Letterman earlier in the year, I've been listening to some of his CD's. Remembering his 'Redneck Mother' tune on a Jerry Jeff Walker tape, I realized I hadn't heard much of his other work.

Time and Inspiration, is the mother of invention.

Got a Fitbit and lost 35 pounds - walking, jogging and tracking steps.

Next, I decided I needed to develop my musical talent learning to play guitar. I now have 2 resonators, one acoustic 4 string bass and a 6 string electric dobro (plus a Fender lap slide, but who's counting).

Here's the Dobro in it's stand


Now I've got some new Noise on the Line - amp line that is!

Noise on the Line Resonator

Anyways, while listening to Hubbard lyrics, I centered in on the catfish bones verse and decided to give my guitar avoidance and 'weight loss and gain it back again', a break to make some catfish bone combs.

First you need a woman to make them for.

Then you need a Catfish (plus a Red Snapper for a bone quality check and more servings)
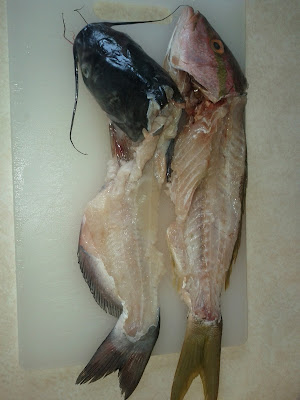
Fish bone combs in waiting

Fillet the fish and make lunch -

Then it gets complicated.

Fleshing the carcass down to bone has options.

If you do some google searches on cleaning fish bones, you learn about flesh eating beetles, leaving fish on anthills, and how oily and fragile fish skeleton's can be if you try to boil them.

Being out of flesh eating beetles, I opted to let them sun dry a few days, attracting flies and wasps and then spent an hour or so scissoring off the fish jerky between the backbone vertebrae.

Next, I did a soak in Acetone solvent to separate fatty oils and loosen up connecting tissue. Acetone worked pretty good and got inside the backbone to loosen up nerve strings and tissue in the spinal column, that beforehand, had been like iron re-enforcing rods in concrete.

After the Acetone bath and some dry scrapping, I decided to 'simmer' them in luke warm water for a few hours. Good move.

This re-hydrated and softened up the remaining jerky, and the heat separated the oil, in preparation for a more thorough scraping.

 I used a sharp nosed tweezers to scrape, pick, and investigate the skeletal bone tunnels and channels. Searching for and finding a lot of hidden tissue treasure. With time, the bones were starting to get clean!

Fish bones in Acetone bath
What 'dem bones' needed now, was some Colorado sunshine. So I left ol' Catfish's bones to bleach, in the Range of the Buffalo - for a few hours anyways. August Sun is amazing whitener - smile more!

With the bone preparation about complete, I had to figure out how to cast handles.

I wanted clear resin, so I found Encapso K and Epoxacast on Smooth-on. Well initially I found a Water Clear product, but following that rabbit trail, it turned into a rat hole that required about $300 of new vacuum chambers and pumps to get the bubbles out, plus platinum core mold resin. Youtube has oodles of info on casting and mold making, btw.

Vacuum pumps and chambers, maybe down the road, but not today.

So clear handles to seat half the bone, leaving one side outside as the comb teeth.

I collected a bunch of smooth agates and egg shaped rock, a couple summers ago, on the shore of Lake Superior, up close to Copper Harbor, Michigan.

Loved those rocks, so they became the first models to cast in the tin core Mold Max T 15 I also bought from Smooth-on.

Mold box candidates?


Since it was clear resin, I also dug up some multi-colored beach glass chips to spice up the cured bone profile.

Here's a look at the V1 cured molds.

Cured Molds for casting Fish bone combs


Finally, after cure, some fish bone swag and other primitive art, plus plenty of lessons learned for Round 2!


Fish Bone combs - Hair Picks - and Sea Glass spiced Rocks


Got some sweet Petri coaster designs out of the project too.

Green Beach Glass 60mm petri dish whatchamacallit

Aspen mosaic coaster in 100mm glass Petri Dish

Cape Brenton Beach Glass Desk thingee in 60mm Petri dish


Sunday, April 21, 2013

New Walleye Crawler rigs

Here's a few pictures of some new smaller sized rigs. These are weighing in at 1/16oz.

What's different?

I used smaller components to reduce their weight; smaller diameter stainless wire, smaller prism eyes, High visibility (but lighter) plastic beads, smaller propellers or smaller June bug blades.

Another option is that the swivel attached Mustad Slow death twirler hook is on 11 inches of 8# mono. Other hook choices are available in the web store.

Back to the pictures. Two styles in this batch. One with the June Bug blade and the other with double propellers.

June Bug blade version

Double small propeller version

Sixteen color and blade variations with options on hook types.

11 inch slow death crawler rigs waiting for attachment

R bends waiting for swivels!

Plastic UV sensitive body beads in black light 

Six pack headed to an assortment offer

June bugs with faceted glass tail beads

June bug tail spinners

Double propeller models in a few fluorescent colors

Styrofoam leader wrap to wind and control mono for clam shell packaging
Here's the first batch with medium size components in the web store. There's still a smaller set of components to bring them into the 1/25oz range.

Got them being tested in South Dakota, will update the post after some pictures come back in!


Tuesday, March 26, 2013

In case you haven't noticed ---

Paint has 'Pain' in it.


So, I decided to break out the big components and make some Muskie spinners.

As luck would have it, the painted body beads were in short supply. Warning!!! - Paint cycle alert.

What's a paint cycle alert about?

Here's a clue.. check the first sentence.

Beyond the one liner, well, it gets complicated quick.

First, I need to muster up the inclination to plan and tackle the project... nothings ever easy, is it?

Good things, may come to those that wait, but only what's left..

I guess there's no time like the present to get the show on the road.

Like I tell the G-kids. If you want to finish your chores, you need to stop whining, and start one.

Ok, whew, the inclination hurdle is in the rear view...

The Process


 Now thinking about the project, I need to clean off more space on the work bench.

Have I shown you my dream Spinner Shack layout? It's organized differently, much bigger... shared with squirrels, not cats....

Lots of windows facing the River. My Ridgetop Spinner Shack Squirrel Sanctuary.

Thank-you Jesse Colin Young

Mossy rock formations surrounded by pine needles and rotting leaves.

Shafts of sunlight filled with dust from the disturbed forest floor.

Disturbed as I stalk toward the massive brown trout.

He lays below the fanned out roots of a cedar dead fall, waiting and watching for his prey.

As I try, desperately, to avoid this painting chore blog post.

Painting sure trips the stall wire, almost like writing about it does..

Try that again

Anyways, once again, I need to clean off some space on the workbench.

Painting drags out a mess of support tools - like

Jars of bulk powder paint colors, component beads and bodies, a sweet Milwaukee heat gun, hundreds of paint wires, A few wooden cooling stations, bake racks, baking wires, A bake prep rack, The oven, A post-bake drying rack, and finally finished product storage.

OK, so much for space on the work bench, better plan a lean-to on the Spinner Shack, LOL.


Now a few tests to get back in the paint zone - adjust heat gun temp - Check, windage heat times based on bead sizes - Check, clean up the round nose pliers - Check, fire some wires to torch off any old paint - Check.. basically get organized and try to remember any lessons learned, noting any pulsing body parts or twitches resulting from specific memories.

Let the adventure begin! Now we're having fun!!!

String a batch of beads on to the paint wires.


Brass beads for solid colors. Nickel for transparent colors. Trusty round nose pliers. A rubber pad to keep things from rolling around. This was a scrap for the picture. The real one's bigger, LOL.

Background has a tube of Paint wires with the bearing bead, a tube of ashed over dip wires that were torched to clean them, a tube of used dip wires with paint still on them.

Pick your power color and spoon some from the storage jar to a dipping jar.

Per bead Ops


Position a bead in the middle of the wire and support it with the round nose pliers below it.


Reduction nozzle on adjustable temp Milwaukee Heat Gun. Bulk Powder Paint. Powder Dip can.

Hot Drop grip on the Paint wire as it's heated. I've tried lots of techniques. This position leaves the base and top of the paint wire cooler. That's important for the next step when it's going into the dip can. Imagine counting up to eight. One thousand one, ...., one thousand eight. OK, it's hot enough.

Too hot the power smokes, burns and bubbles. Not hot enough, the powder doesn't melt to the metal. Note** err on the side of not hot enough.


This one's not hot.. This was a staged re-creation using one hand and the cell phone. Note to self, find some hand lotion...

Another tried and true discovery.

Dipping is a two hand job.

What do you do with a hot metal part covered in melting plastic strung on the world's smallest branding iron?

Something quick. Melted plastic drys hard. especially over wrapped stainless wire.

I found that if I grab the part (again with the round nose), only this time above the painted part I can swing over to the wooden cooling station, then flip it over to seat the wire into a drill hole.

Eureka, the hot part slowly sinks, sliding down the wire to rest on the wooden rack. This action not only keeps the part from cementing to the wire as it cools, but reams out most of the paint that got into the components hole during dipping, leaving it on the wire.  SweeeeT!


Notice the paint trailing down the dipping wires. Those beads started out on top of the wire when they were seated.

Imagine about a hundred of these colorful little asteroids lined up on the wooden cooling board.

Time to get Baked!

OK, now what...Time to get them ready for baking. If you don't bake them, the plastic is brittle and chips off easily.

Don't believe me, drop one on the floor. Did I just hear some curse words?

I've found I need to move the dipped part to a clean wire before baking.

If you try to bake it on the dipping wire, either hanging it immediately without cooling or flipping it back against the wires loop, all that paint that slid out of the hole, is back inside it, waiting to bake and harden into a bond akin to lava rock, stronger then say - the love of one drunk for another?


I have a Black and Decker variable temperature toaster oven w/timer. I'm happy with it. I try to do small on-demand batches. This keeps the painted inventory limited, but maximizes flexibility on raw materials. To each his own.

I built a wooden stand for the oven rack, then added those black office clips, end to end on each of the oven racks wires. The clips grab, separate and suspend each painted part during it's time in the oven.

I found, that putting that small round bead on the baking wire first, before the part, helps to avoid a lot of baked part wrestling, pinched fingers, broken wires, chipped parts and other varieties of strain related injury and foul language. These behaviors are known to occur during the 'Baked  Parts Removal Festival' (BPRF).

In practice, excess paint melts and drains off each part while it's suspended vertically in the oven.

The small bearing provides a narrows between itself and the part, like an hour glass. A pivot point for snapping loosing the part.

Without it, the melt off paint coats the wire and turns to concrete. I've thought about putting a split ring hook on it and calling it done, but only in my dreams!

Stay tuned for the Parts Removal Festival post!

Anyways, with this technique I can usually just use the round nose pliers to snap between the part and small bead to loosen the part and slide it off the wire.

I've tried stacking several parts on the backing wire too.

In my opinion, it seems that removing the parts is less frustration, if they're not stacked.

If there's a lot of melt off the part, it's not that easy. Time for the wire cutter jaws, but again, having the narrows, albeit coated separation seems to help.

The sooner after the bake cycle you get to removing them, the better -  and as always - practice makes perfect.

I think certain paint colors are more problematic then others. It's likely the way the mix is made. Some seem to coat much thicker then others.

Transparent is fun to work with. The solids seem to be the ones that coat thick, coat the round nose, bake and run, you name it, but if you want the fluorescent colors, there you have it.

Fast forward past all the remaining toil and trouble (removing each part after baking) to a blissful box of painted parts.


Another picture of the painted parts lined up on Muskie spinners.

Fish Creek Spinners in progress Muskie Spinners 2 oz+ Single Bites
Stay tuned, these are large (2+ ounce) single blade Double Skirted Armadillo's - #9 .40 gauge Fluted blades. Sixteen colors. - Silicon Star flash Skirts.


Thursday, March 21, 2013

U-Turn Rock Hoppers - new Cable Spinner


Here's how it went down.

I started out wanting to make a bottom bouncer spinner that could be used in fast deep water channels and cascades.

You know a bottom bouncer - those cool wire sinkers about 10 inches long, used to get depth or troll bait along the bottom.

You know the places too. Too fast for most lures and spinners. I always put on a heavy spinner and try a few casts, watching as the spinner hits, and it immediately shoots by downstream, tightening line and breaking the surface as it arc's over to crash into some big rock wall. Forget about casting downstream... Powerful white water. Dam spillways with deep fast current. Home to big fish.

Beaten, I leave these chutes feeling like big fish are there, but just too deep.

One trip I brought along a 1oz zonker spinnerbait and caught one in a chute - what a fish!

Platte River Rainbow on 1oz Zonker Spinnerbait
The nice ones 'are' down there.

So I started off with wire. I put an R bend in the bottom of a 12 inch  length of .028 stainless and strung on a .4 ounce double taper body for weight ... the bouncer.

Then did an R bend about 7 inches up and then built a Colorado bladed spinner, using a flat glass prism eye to fish it up.

Finished it off with a split ring attached #6 zonker dressed treble on a slip R bend.

Oops, not done yet. Added a skirt band over the U-turn R bend, to keep line from sliding around when cast.


Seemed like a decent idea for a prototype, but then I began to worry about it twisting 180 and how it might behave in low current. It will likely be fine, but stay tuned.

Because I had second thoughts, I then thought about using nylon coated cable vs wire, kind of like a weighted cowbell. The more I thought about it, I liked the flexibility of 15# test cable.

It's flexibility - allowing it to pendulum through the water was a definite plus - hopping or dragging over rocks while still suspending the spinner above bottom obstacles.

Same with the spinner side, cable would allow side to side and up and down motion which seemed like a fish enticing property.

So I quickly moved through the wire version, right into this unique cable spinner design. I think it will find lots of applications. Trolling or drop drifting through fast water river channels for trout and salmon.

Here's a picture of one. The weighted cable is looped to get into the picture. It's sixteen inches long and the weights slid and clack.


Sixteen inches of flexible drop, weighing 1/2oz, with a bottom loop in the cable to add more weight, if needed.

Those are two white quartz rock bars (about 1/2oz worth of rock) separated with a black nickel bead to provide a sliding clacker. What a Fish Witch!

Noise on the Line!

Why U-turn? Used a .051 inch Stainless wire right angle bend to brace the cable's U-turn. This will support and suspend the spinner away from the drop cable.

A crane swivel at the bend for line attachment.

Four inch Flex cable Propeller spinner - flat glass prism eyes - split ring attached Zonker weedless Aberdeen single hook.

I used the weedless hook to try to defeat fouling across the cable ends during casts. It's split ring attached and other hook choices will be available in a hook choice drop down.

I'm excited about the double pendulum action on both cable ends. Should present differently then many spinners, more like a big stinger in current or while being trolled. Reel a couple cranks, raise and drop. Then set the hook, lol.

The weighted cable enables deeper more natural bounce drifts through rocky bottoms, when fishing in hard to fish fast current channels.  I built it for those fish.

Headed to the ponds tomorrow. Can't wait to get some feedback.

Monday, March 18, 2013

Fire Fly ultra smalls - smallest of the smalls

I'm bringing back the Fire Fly spinner for the 2013 fishing season.

This spinner weighs in at barely .03 hundreths of an ounce. That's 1/30 ounce and tiny.

Use it when you find yourself fishing some tiny tributary - the one you can step across and only get one foot wet.

The dark water with the banks and overhead clogged with willows or elders.

The one nobody fishes.

We've all been to these places and have a hunch that no fishing pressure = plenty of fish.

This is the spinner for these places with limited casting distance, but current - babbling brooks.

Here's a few pictures and I'm done.


The blades are #1 Indiana's, a couple have #1 French blades.

Body beads for color are seed beads. The tail bead is a 4mm faceted glass bead.

#12 treble hooks, but choices are available.

Small streams - Trout and Panfish

Put on your Rambo mindset and do some bush-wacking!

Fire Fly Spinners

Thursday, March 7, 2013

Fish Creek Spinners Web store

I'm trying to simplify the Fish Creek Spinners web store navigation, removing long scroll lists on the Category pages and replacing that with tables of choices within the category.

From these you drill into the detail pages where you can select and add products to the shopping cart, etc. prior to check out.

Here's a compressed version of the technique - levered into the blogs page format size limits.

There's other goodies like popup fish pictures and flash slideshows, but this is just a sample of the 'improved' drilldown and cleanup.

For the real thing, and a sample of the lower levels of the drill down, Visit the store!

Fish Creek Spinners Web Store Navigation

  • Use the Category links on the left to view and scroll groups of spinners
  • Click on a small pictures or links to go to the spinners detail page.
  • Mouse over the small pictures to expand it's picture to read descriptive information about it.
  • Scroll down the page to see Model Specifications and other shopping help.
  • There's also a Search Store box up on the right side header.
Ultralite Spinners
Medium Spinners
Large Spinners
Spinnerbaits
Fish Creek Spinners Stream Trout fishing spinners
Fish Creek Spinners Salmon fishing spinners
Fish Creek Spinners Large fishing spinners
Fish Creek Spinners Spinnerbaits
Ice Fishing Tackle
Walleye Fishing Tackle
June Bug Spinners
Spinner Assortments
Fish Creek Spinners Large fishing spinners
Fish Creek Spinners Spinnerbaits
Fish Creek June Bug blade Spinners


Tuesday, March 5, 2013

Skirted Crankshafts - Need any?

Blame it on the Colorado sun, but a new 1 ounce spinner is in the chute and rearing to get in the water!

This one has a unique S clevis water chopper between the metal body and the starflash skirt. The Super Willow blade contacts and rotates this thing during rotation. Noise on the Line.

I actually bought these unusual S shaped clevises last year after seeing them at Worth's Inc. Then opt'd not to use them after a few tests.

I didn't have much luck balancing them with the spinners and blades I hoped to use, so they didn't fulfill their part of the bargain, and went into storage.

The nice thing about having lots of stuff, is every now and then an idea sprouts and needs some stuff - to give it traction. That was the case with the errant clevis.

The S clevis turned into a spinner crankshaft of sorts, lol.

Here's a few pictures.

1oz Perch Crankshaft
1oz Silver Streak Crankshaft

1oz John Deere crankshaft - this ones a B! 

More in the web store! Skirted Crankshafts Be the first to put one in your tackle box!


Wednesday, February 27, 2013

Eggs, Eyes - and Swivels

Meaning to write a blog post... and in the spirit of a few Badlands photo's I found hiding in my stash, here's what I came up with.

First the photo's -

Dry Dirt
South Dakota Badlands National Park dirt
The potential of Dirt

Badlands layers - dirt and time - just add water
So in the spirit of endeavor - A + B = C - here's that post.

I bought the stick-on eyes and crane swivels from Hagen's and the wholesale beads from Modebead.com - three sizes of ovals (eggs) and about 10 colors of each.

Slow Death hooks from Shorty's.

Here's a taste of what they look like out of the box -

Oval flat glass beads 
Customer Rep at Mode Beads said she didn't know fishing was into fashion.  Just sayin.

Oh well, Fun, Fun, Fun, Fish Fashion.

I sure like to look at shiny stuff! Sure it's purdy, it's made from sand.

 I think it has to do with all the sun in Colorado, lol.

So, I've started to put a dent in the flat glass beads and prism eyes recently.

A dent means empty paper cards where there once were stick-on eyes. Empty strings where there once were strung beads. And sticky fingers and the smell of drying lacquer in the workshop.

Strings and paper cards
Bottom line?

The beads are sweet new components. Stick a couple of eyes on them, coat them with lacquer, and fashion takes a turn to fishy.

Oval Flat glass and lacquered stick on eyes
Next, got to tie some swivel rigs for the Mustad Slow Death hooks - yesterdays post.

Mustad Slow Death hooks on 8 inch swivel Walleye Rigs

I like the finished products and so does a guy in North Dakota


The South Dakota Walleye's already voted -


Decided on two models - one using the small ones for 1/16oz spinners


and another using the largest size for walleye propeller rigs. I need to get new pictures of the finished rig, made some changes, the link shows an older version.


Still waiting for inspiration on the medium size. Most likely I'll split the baby, going for two models - a larger spinner and a smaller rig.

Whew, let me publish this thing.

Time to get back to tying some work in progress Zonker spinnerbaits.

These going to a guy in Pennsylvania to be used on Canadian Pike in June. Going to tye a Perch pattern on the Yellow one.


The Main blades can be changed.

Added some stingers and extra blades to the order. I love my job, custom orders ROCK!

You might find better, but you won't get more time, energy or passion in your mailbox for some time!

Oh yeah, please feel free to comment, share on your fishing circles and communities, facebook groups and most certainly - blog rolls.

Just sayin.