


Powder coat painting fishing spinners
You can find quite a lot of information on Youtube for powder painting fishing jigs (jigs are blessed with the hook which is a ready handle when painting), but painting spinner components is different and I didn't find much info or instruction.What I did find, didn't work well for me. Could be a liveware problem! Heat sources varied from candles, to lighters, to hair-dryers. I use a portable propane torch. It works for me.
Why are spinner parts different?
It's because 1) the components have holes that plug with hot powder paint and 2) they seemed to easily fall into the powder once hot while dipping (which is a major pain).
Here's a few pictures and explanation of my techniques and some tips you might find worthwhile, if you want to try it.
What you'll need.
- Spinner components (body bullets, beads, blades, etc)
- Powder Paint (I used ProTec - bought through Hagens)
- Dippers
- Hangers
- Toaster Oven

Here's a dipper I made with a big brass body bullet on it. You can also see my propane bottle. The dippers are stainless wire seated in 2x2 x 3 inch wood. It stands up by itself which is a must when doing larger quantities. I'll explain how I made it later.
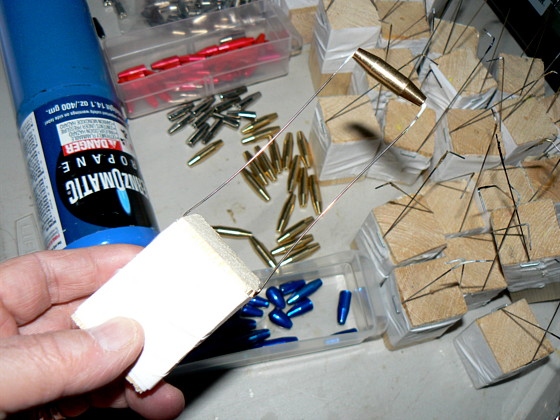
Here's another component on a dipper. Notice the wires on the table. Those are the removable hangers I mentioned earlier. Also the collection of waiting dippers standing at attention.

Here's a dipper about to put the hot component into the plastic powder paint bottle (really not hot for the picture).

Kind of an overview shot. You can see the torch nozzle for the propane. I prefer the camping version of the portable propane, but was using a taller version on this day. Notice all the empty dippers standing at attention and ready for duty.

Here's the process I use.
Setup
Seat up a bunch of components on the dippers
Shake, Open and Stir the Powder you choose
Fire up the torch
Dipping
Run each dipper's component thru the flame 3-4 seconds depending on size then do opposite side the same.
If the light is right, you can see the oil evaporating off the part. Chase it off with the flame, then flip and heat parts opposite side.
I then let heated part cool 3-4 seconds, to even out its heat before dipping it into the powder.
Dip 'hot' part completely into powder. As removing, I tap a the dipper wires on the rim of the bottle a couple times to even out the parts top coverage which tends to collect as its melting.
You'll need to experiment with how hot to get the part, too hot the liquid powder bubbles or burns and wrecks it. Too cool and the powder finish sucks and looks crystaline. Because parts are different sizes, remembering or experimenting with timing is everything. To get consistent finishes you need to keep records or practice, by part. Heating consistency is important period, even when doing many of the same part.
Cooling
Stand dipped part and dipper up (out of the way) to cool. Getting branded by hot parts, not fun.
Repeat dipping cycle on next Part.
Observation/Tip
If you heat a part too long, the paint will bubble and smoke, kind of ruins the part. If you dont heat long enough, you get crystaline looking paint coverage which is easier to deal with, so make your error on the side of cooler parts, (got a tip from Blog post to use heat gun vs flame) until you get the heat timing down for the size part your working. Also helps to try to keep the torch running at same sound. When propane starts getting low, you'll notice it happening cause the sound decreases. Not a big problem, but try to be consistent with flame size if using a torch.
Baking Process
Observation/Tip
You may want to let them chill awhile before baking, I'm still working wrinkles out of this process to see if warm baking causes drops to form, or if its based on certain paints. I like all the transparents, they dont seem to form drops. The fluorescent solids seem to be more difficult to do without causing droplets to form during baking. Which make the part non-symmetbric and require manual rework.
Hanging
After you're out of dippers to paint, you should have a bunch ready to put on hangers. Remove them first to last (if warm baking) to let them cool. This is where the stainless wire helps by not sticking as much when you remove the part. I tried softer wire and it lost its temper and broke inside the hole. Once off, put the part on a removable hanger wire and hang from one of the oven hangers. Keep that up til the ovens full.
Observation/Tip
Paint will collect on the wires. After painting a batch, I usually run the empty dippers thru the flame to burn off excess paint that collects on the wires.
Bake
Set the timer and bake at 350 degrees 20 minutes (per ProTec instructions).
Let them cool before trying to remove them.
Observation/Tip
Don't put the oven C hangers to close to each other or you can end up bonding parts to each other. The little buggers dance around pretty good during the bake process and can shift.
Final steps
After parts are cooled, take the parts and removable hangers (stainless steel again) out of the oven and remove the parts. This can be problematic if paint seeps it way down into the parts holes. My experience is it seems to be unavoidable on the solid colors. If you end up with a part with a clogged hole, I put the part in a hand vise, and heat a spare spinner wire red hot to ream out the hole. Works fine to salvage the part.
Making a dipper
I use 7-8 inch stainless wire, maybe .031in gauge.
I use 2x2 wood cut in 3inch lengths, drilling a small diameter hole thru it to seat the stainless wire.
Put a wire in one side about an inch and bend to a right angle along the 2x2, then to a 60 degree at the top edge
Repeat for other wire
You should have a pretty good X overlap to give the wires spring
I duct tape the wood and wires to secure them into position and staple them with a staple gun.
I leave about 4 inchs of length on each and bend another right angle at each end, snipping to leave 1/4inch for inserting each into a part.
Try to seat a few parts. The dipper should reach to bottom of bottle, as powder level starts dropping the more you paint the color. If wire's are too short you cant get to the good stuff at the bottom of the bottle!
Have fun, don't brand yourself and dont tip over the torch or drop a hot part in your lap.
Take a look at more of the painted bodies!
1 comment:
wow, nice post, never knew what it took to make hand-made plugs. Bet it feels amazing to hook something on a lure that u tottaly cutomized...again great post
Post a Comment